Udemy 강의가 어느덧 50퍼를 넘겼다. 중간에 어려운 부분도 몇 개 있었지만 이제 어느정도 혼자서 구축할 수 있을 것 같다. 사실 그때 그때 바로 정리하고 싶었는데 어쩌다보니 밀려서 오늘부터라도 바로바로 정리하는 시간을 가지려고 한다.
Shop 어플은 우선 GridView 로 상품을 보여주고 상품별로 title 과 좋아요 , 장바구니담기 가 존재한다.

우선 이렇게 분리했다. models 에는 상품 에 대해 정의되어 있다.
아래가 product.dart 이다. 변수를 선언해주고 생성자까지 구현해주었다.
class Product {
  final String id;
  final String title;
  final String description;
  final int price;
  final String imageUrl;

  Product({
    required this.id,
    required this.title,
    required this.description,
    required this.price,
    required this.imageUrl,
  });
}
다음은 상품들을 UI 에 보여주기 위한 screen 이다.
초기에 더미 데이터를 생성시켜줬다.
import 'package:flutter/material.dart';
import '../widgets/product_item.dart';
import '../models/product.dart';

class ProductOverViewScreen extends StatelessWidget {
  final List<Product> loadedProducts = [
    Product(
      id: 'p1',
      title: 'Red Shirt',
      description: 'A red shirt - it is pretty red!',
      price: 29,
      imageUrl:
          'https://cdn.pixabay.com/photo/2016/10/02/22/17/red-t-shirt-1710578_1280.jpg',
    ),
    Product(
      id: 'p2',
      title: 'Trousers',
      description: 'A nice pair of trousers.',
      price: 59,
      imageUrl:
          'https://upload.wikimedia.org/wikipedia/commons/thumb/e/e8/Trousers%2C_dress_%28AM_1960.022-8%29.jpg/512px-Trousers%2C_dress_%28AM_1960.022-8%29.jpg',
    ),
    Product(
      id: 'p3',
      title: 'Yellow Scarf',
      description: 'Warm and cozy - exactly what you need for the winter.',
      price: 19,
      imageUrl:
          'https://live.staticflickr.com/4043/4438260868_cc79b3369d_z.jpg',
    ),
    Product(
      id: 'p4',
      title: 'A Pan',
      description: 'Prepare any meal you want.',
      price: 49,
      imageUrl:
          'https://upload.wikimedia.org/wikipedia/commons/thumb/1/14/Cast-Iron-Pan.jpg/1024px-Cast-Iron-Pan.jpg',
    ),
  ];

  @override
  Widget build(BuildContext context) {
    return Scaffold(
      appBar: AppBar(
        title: Text("My Shop"),
      ),
      body: GridView.builder(
        padding: const EdgeInsets.all(10),
        itemCount: loadedProducts.length,
        itemBuilder: (ctx, index) => ProductItem(
          loadedProducts[index].id,
          loadedProducts[index].title,
          loadedProducts[index].imageUrl,
        ),
        gridDelegate: SliverGridDelegateWithFixedCrossAxisCount(
          crossAxisCount: 2,
          childAspectRatio: 1.5,
          crossAxisSpacing: 10,
          mainAxisSpacing: 10,
        ),
      ),
    );
  }
}이후 Widget 부분을 보면 body 에 GridView 를 builder 로 정의해줬다. 다양한 방법이 있지만 builder 가 가장 편하다. builder 를 사용하기 위해선 itemCount itemBuilder gridDelegate 가 필요하다. itemCount 는 GridView 로 그려낼 총 개수를 의미하고, itemBuilder 는 그려낼 아이템을 의미한다. gridDelegate 는 GridView 의 옵션 이다.
builder 에서 ProductItem 메소드를 호출하는 것을 볼 수 있는데 품목 에 해당하는 위젯 을 분리하기 위함이다. 그럼 product_item 을 살펴보자.
import 'package:flutter/material.dart';

class ProductItem extends StatelessWidget {
  final String id;
  final String title;
  final String imageUrl;

  ProductItem(this.id, this.title, this.imageUrl);

  @override
  Widget build(BuildContext context) {
    return GridTile(
      child: Image.network(imageUrl, fit: BoxFit.cover),
      footer: GridTileBar(
        backgroundColor: Colors.black54,
        leading: IconButton(
          icon: Icon(Icons.favorite),
          onPressed: () {},
        ),
        title: Text(
          title,
          textAlign: TextAlign.center,
        ),
        trailing: IconButton(
          icon: Icon(
            Icons.shopping_cart,
          ),
          onPressed: () {},
        ),
      ),
    );
  }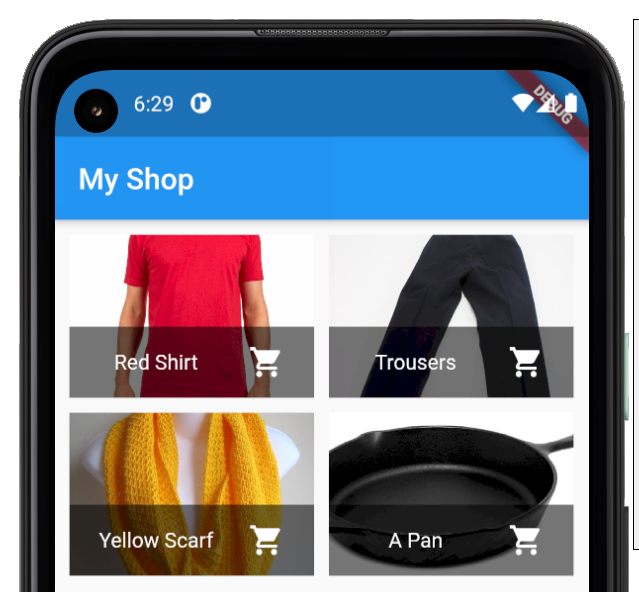
}넣어준 매개변수 id , title , imageUrl 을 이용하여 품목 을 그려낸다. 여기서 GridTile 로 구현하는데 LIstTile 과 동일하다. footer 와 header 가 존재한다. 말 그대로 footer 를 쓰면 바닥에 header 를 쓰면 천장에 구현된다. 예시를 보자. 첫 번째 사진이 header , 두 번째 사진이 footer 이다.
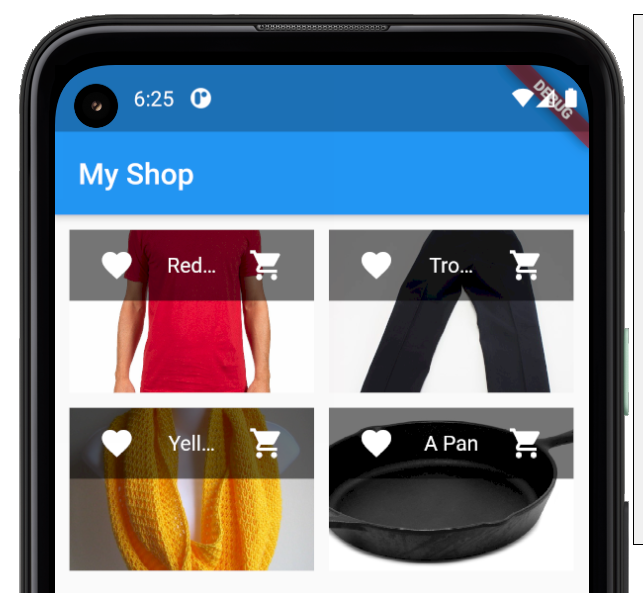

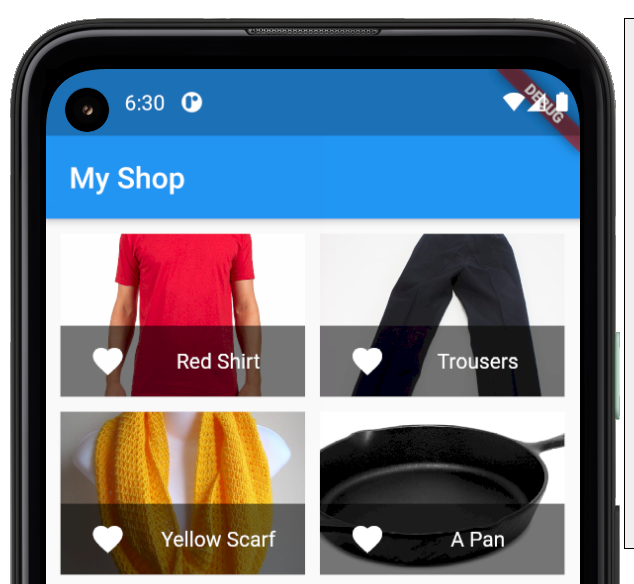
이후 child 요소들로 leading title trailing 이 존재하고 이들을 이용하여 배치를 할 수 있다. leading 은 front , title 은 ㅇㅇ... trailing 은 back 이라고 생각하면 쉽다. 그렇다면 현재 어플에서는 3가지 를 모두 사용했는데 이 중에 하나라도 사라진다면? 역시 예시를 보자.
첫 번째 사진은 leading 을 제거한 사진, 두 번째 사진은 title 을 제거한 사진, 세 번째 사진은 trailing 을 제거한 사진이다.

이렇게 구현이 된다.
GridTileBar 를 보니 subTitle 이라는 값이 존재한다. 살펴보자.

이후에 GridTile 로 구현한 상품 하단의 좋아요 와 장바구니 버튼을 실제로 동작하도록 구현해봤다. 기존의 방식과 다른 방식으로 구현했는데 Provider 라는 새로운 개념을 도입했다. 사실 이해하는데 좀 어려웠다. 아직도 제대로 이해하지 못하고 있다고 봐도 무방하다. 일단 공식문서를 들고 왔다. 하지만 어려운게 현실...
https://pub.dev/packages/provider
provider | Flutter Package
A wrapper around InheritedWidget to make them easier to use and more reusable.
pub.dev
정리되어 있는 글이 있어서 첨부했다.
https://eunjin3786.tistory.com/255
[Flutter] Provider로 앱 상태 관리하기
아래 움짤처럼 여러 화면에서 상태를 공유해야할때 어떻게 해야하는지 State management 문서를 살펴보겠습니다. 1) 선언적으로 생각하기 우선 선언적으로 생각하라고 합니다. SwiftUI 처럼 state가 바
eunjin3786.tistory.com
간단하게 설명하자면 Flutter 는 Widget 으로 구성되어 있는데 이게 어플을 제작하다보면 Widget 간의 Depth 가 기하급수적으로 증가하게 된다. main → class A, class B, class c... 뭐 상관 없을수도 있지만 만약에 서로 다른 부모를 갖는 (class A-1과 class C-3 이런 느낌?) 경우에 매번 build 를 다시해야한다. 이렇게 말하면 이해가 어려우니 예시를 들어보자.

상품에 좋아요 와 장바구니 버튼이 존재하는데 좋아요 페이지와 장바구니 페이지가 있다고 가정해보자. 버튼이 클릭될 때마다 계속 build 가 발생한다. Widget 의 Depth 가 깊지 않으면 상관이 없지만 연속적으로 inherit 된다고 가정하면 메모리 누수 가 발생할 것이다. 이를 효율적으로 관리하는 것이 바로 provider 이다. 데이터 에 쉽게 접근하겠다는 것이 목표
products.dart 와 이를 사용하는 products_grid 를 살펴보자.
import 'package:flutter/material.dart';
import 'product.dart';

class Products with ChangeNotifier {
  List<Product> _items = [
    Product(
      id: 'p1',
      title: 'Red Shirt',
      description: 'A red shirt - it is pretty red!',
      price: 29,
      imageUrl:
          'https://cdn.pixabay.com/photo/2016/10/02/22/17/red-t-shirt-1710578_1280.jpg',
    ),
    Product(
      id: 'p2',
      title: 'Trousers',
      description: 'A nice pair of trousers.',
      price: 59,
      imageUrl:
          'https://upload.wikimedia.org/wikipedia/commons/thumb/e/e8/Trousers%2C_dress_%28AM_1960.022-8%29.jpg/512px-Trousers%2C_dress_%28AM_1960.022-8%29.jpg',
    ),
    Product(
      id: 'p3',
      title: 'Yellow Scarf',
      description: 'Warm and cozy - exactly what you need for the winter.',
      price: 19,
      imageUrl:
          'https://live.staticflickr.com/4043/4438260868_cc79b3369d_z.jpg',
    ),
    Product(
      id: 'p4',
      title: 'A Pan',
      description: 'Prepare any meal you want.',
      price: 49,
      imageUrl:
          'https://upload.wikimedia.org/wikipedia/commons/thumb/1/14/Cast-Iron-Pan.jpg/1024px-Cast-Iron-Pan.jpg',
    ),
  ];

  var showFavoritesOnly = false;

  List<Product> get items {
    if (showFavoritesOnly) {
      return _items.where((productItem) => productItem.isFavorite).toList();
    }
    return [..._items];
  }

  Product findById(String id){
    return _items.firstWhere((element) => element.id == id);
  }

  void addProduct() {
    notifyListeners();
  }
}import 'package:flutter/material.dart';
import '/providers/products.dart';
import '/widgets/product_item.dart';
import 'package:provider/provider.dart';
class ProductsGrid extends StatelessWidget {
@override
Widget build(BuildContext context) {
final productsData = Provider.of<Products>(context);
final products = productsData.items;
return GridView.builder(
padding: const EdgeInsets.all(10),
itemCount: products.length,
itemBuilder: (ctx, index) => ChangeNotifierProvider(
create: (c) => products[index],
child: ProductItem(),
),
gridDelegate: SliverGridDelegateWithFixedCrossAxisCount(
crossAxisCount: 2,
childAspectRatio: 1.5,
crossAxisSpacing: 10,
mainAxisSpacing: 10,
),
);
}
}products_grid 를 먼저 살펴보면 Provider.of<자료형>(context) 로 선언한 것을 볼 수 있다. 이것이 바로 Provider 로 관리할 변수이다. ChangeNotifierProvider 는 Provider 로 관리하는 아이템에 상태 변화가 일어나면 setState 해주는 부분이다.
import 'package:flutter/material.dart';
import '/providers/product.dart';
import 'package:provider/provider.dart';
import '../screens/product_detail_screen.dart';

class ProductItem extends StatelessWidget {
  @override
  Widget build(BuildContext context) {
    final product = Provider.of<Product>(context, listen : false);
    return ClipRRect(
      borderRadius: BorderRadius.circular(10),
      child: GridTile(
        child: GestureDetector(
          onTap: () {
            Navigator.of(context).pushNamed(
              ProductDetailScreen.routeName,
              arguments: product.id,
            );
          },
          child: Image.network(product.imageUrl, fit: BoxFit.cover),
        ),
        footer: GridTileBar(
          backgroundColor: Colors.black54,
          leading: Consumer<Product>(
            builder: (ctx, product, child) => IconButton(
              icon: Icon(
                product.isFavorite ? Icons.favorite: Icons.favorite_border,
              ),
              onPressed: () {
                product.toggleFavoriteStatus();
              },
              color: Theme.of(context).accentColor,
            ),
          ),
          title: Text(
            product.title,
            textAlign: TextAlign.center,
          ),
          trailing: IconButton(
            icon: Icon(
              Icons.shopping_cart,
            ),
            onPressed: () {},
            color: Theme.of(context).accentColor,
          ),
        ),
      ),
    );
  }
}
ProductItem 을 살펴보면 역시 Provider.of<Product>(context, listen : false) 로 관리하고 있는 것을 볼 수 있다. 이후에 Consumer 도 등장하는데 Consumer 부분만 새로 build 하게된다.
설명이 많이 부족하긴 한데 나도 아직 100% 이해하고 있지는 않은 것 같다. 실제로 사용해보면서 감을 잡아야겠다.
소스코드는 아래 링크를 통해 접속하면 확인할 수 있다.
https://github.com/k906506/2021-Summer-Flutter-Study/tree/master/myfourthflutterapp
GitHub - k906506/2021-Summer-Flutter-Study: Studying hybrid app development using Dart and Flutter in summer vacation Mogakko
Studying hybrid app development using Dart and Flutter in summer vacation Mogakko 👾 - GitHub - k906506/2021-Summer-Flutter-Study: Studying hybrid app development using Dart and Flutter in summer va...
github.com
'⛹️ 라이프 > 2021 여름방학 모각코(개인)' 카테고리의 다른 글
| [코독하구만 2] 6주차 - Flutter : Shop App 3 (0) | 2021.08.10 |
|---|---|
| [코독하구만 2] 5주차 - Flutter : Shop App 2 (0) | 2021.08.10 |
| [코독하구만 2] 3주차 - Flutter : Personal Expense App (2) | 2021.07.22 |
| [코독하구만 2] 2주차 - Flutter : Personal Expense App (0) | 2021.07.15 |
| [코독하구만 2] 1주차 - Flutter : Quiz App (0) | 2021.07.07 |